
Today we will create application for a Android device using command line tools. Most books start with Hello World using Android Studio, but to better understand all the moving parts it’s better do everything manually.
Nevertheless I would advice to try Hello World using Android Studio, just to verify that your phone is setup correctly, all USB drivers are installed correctly.
Requirements: Java SDK, Android SDK (scroll down for it), or Android Studio.
First step would be create folder tree for all part:
– create folder AnTest1
– inside create folders: src, res, obj, bin
Next step is create a manifest – create file AndroidManifest.xml (change targetSdkVersion to the one you have):
<?xml version="1.0" encoding="utf-8"?>
<manifest xmlns:android="http://schemas.android.com/apk/res/android" package="com.jumstartprogramming.AnTest1">
    <uses-sdk android:targetSdkVersion="25" />
    <application android:label="AnTest1">
        <activity android:name=".MainActivity">
            <intent-filter>
                <action android:name="android.intent.action.MAIN" />
                <category android:name="android.intent.category.LAUNCHER" />
            </intent-filter>
        </activity>
    </application>
</manifest>
All we did here is declared application named AnTest1 which upon start launches class MainActivity.
Now let’s create a resource file; inside folder res create folder values and inside create file strings.xml:
<resources>
    <string name="helloworld">Hello World for Andriod!</string>
</resources>
And let’s create our source code; inside folder source create folder com, inside it folder jumstartprogramming, inside it folder AnTest1, and inside it file MainActivity.java:
package com.jumstartprogramming.AnTest1;

import android.app.Activity;
import android.os.Bundle;
import android.widget.TextView;

public class MainActivity extends Activity {

  @Override
  public void onCreate(Bundle savedInstanceState) {
    super.onCreate(savedInstanceState);

    TextView textView = new TextView(this);
    textView.setText(getString(R.string.helloworld));
    setContentView(textView);
  }
}
That’s it, now we need to compile and deploy it.
We will create batch file to make it a little bit easies; create file build.bat inside AnTest1.
First we setup our paths (use your paths, not mine):
set JAVA_HOME=C:\jdk1.8
set ANDROID_HOME=C:\Android\sdk
set APP_HOME=%CD%
Next we create variables for all executable we will need (use your paths, not mine):
set AAPT_PATH=%ANDROID_HOME%/build-tools/25.0.3/aapt.exe
set DX_PATH=%ANDROID_HOME%/build-tools/25.0.3/dx.bat
set ANDROID_JAR=%ANDROID_HOME%/platforms/android-25/android.jar
set ADB_PATH=%ANDROID_HOME%/platform-tools/adb.exe
Next we create variables for our classes:
set PACKAGE_PATH=com/jumstartprogramming/AnTest1
set PACKAGE=com.jumstartprogramming.AnTest1
set MAIN_CLASS=MainActivity
If you noticed in setText we accessed our resource string using class R, but we didn’t create any class R?
To create it we will use Android Asset Packaging Tool – aapt.exe:
call %AAPT_PATH% package -f -m -S %APP_HOME%/res -J %APP_HOME%/src -M %APP_HOME%/AndroidManifest.xml -I %ANDROID_JAR%
– package – pack the resources
– -f – overwrite file
– -m – put R withing packages
– -S – path to resources
– -J – output folder for R.java
– -I – path to android.java
Save your batch file and run it to verify that R.java got generated.
Next we call Java compiler:
call %JAVA_HOME%\bin\javac -source 1.7 -target 1.7 -d %APP_HOME%/obj -cp %ANDROID_JAR% -sourcepath %APP_HOME%/src %APP_HOME%/src/%PACKAGE_PATH%/*.java
– -d – output path
– -cp – path to android.java
– sourcepath – our source path
Save your batch file and run it to verify that *.class got generated inside obj folder.
But Android is incompatible with class files, it needs dex files, let’s convert our classes to dexs:
call %DX_PATH% --dex --output=%APP_HOME%/bin/classes.dex %APP_HOME%/obj
– –dex – convert class into dex
– –output – output path
Save your batch file and run it to verify that classes.dex got generated inside bin folder.
Next step is to create APK file:
call %AAPT_PATH% package -f -M %APP_HOME%/AndroidManifest.xml -S %APP_HOME%/res -I %ANDROID_JAR% -F %APP_HOME%/bin/AnTest1.unsigned.apk %APP_HOME%/bin
– package — pack resources
– -f — overwrite existing
– -M — path to manifest
– -S — path to resources
– -I — path to android.jar
– -F — output path for AndroidTest.unsigned.apk
– last one — path to dex file(s)
Android device prevents running unsigned applications, so we need to sign our, next two calls create key and sign new package:
call %JAVA_HOME%/bin/keytool -genkey -validity 10000 -dname "CN=AndroidDebug, O=Android, C=US" -keystore %APP_HOME%/AnTest1.keystore -storepass android -keypass android -alias androiddebugkey -keyalg RSA -keysize 2048
call %JAVA_HOME%/bin/jarsigner -sigalg SHA1withRSA -digestalg SHA1 -keystore %APP_HOME%/AnTest1.keystore -storepass android -keypass android -signedjar %APP_HOME%/bin/AnTest1.signed.apk %APP_HOME%/bin/AnTest1.unsigned.apk androiddebugkey
(if there is a warning during signing just ignore it)
That’s it – we created our first App. Now let’s launch it – create new batch file run.bat
set ANDROID_HOME=C:\Android\sdk
set APP_HOME=%CD%

set ADB_PATH=%ANDROID_HOME%/platform-tools/adb.exe

set PACKAGE=com.jumstartprogramming.AnTest1
set MAIN_CLASS=MainActivity

call %ADB_PATH% uninstall %PACKAGE%
call %ADB_PATH% install %APP_HOME%/bin/AnTest1.signed.apk
call %ADB_PATH% shell am start %PACKAGE%/%PACKAGE%.%MAIN_CLASS%
– shell — commands will follow…
– am — use activity manager…
– start — we want to start some Activity…
– name of the package and full class name, which we want to start
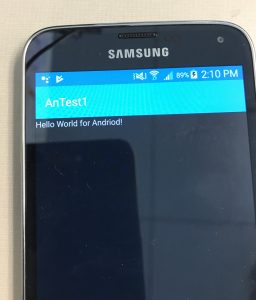
now connect your device and run it. Your app should appear on the device. Success!!!
P.S. cleanup batch file:
del src\com\jumstartprogramming\AnTest1\R.java
del *.keystore
del /s /f /q bin\*.*
rmdir /s /q obj
md obj