Do you want to be able build GUI application once and run it on Window and Linux? Qt might be the answer.
Also in this lesson we will be using cross platform build tool named CMake.
Let’s start with Linux first as it’s the easiest setup ever:sudo apt-get -y install build-essential git cmake qtbase5-dev
That’s it, we are done!
Now for Windows:
1) go to Microsoft web site and download “Build Tools for Visual Studio 2019”
2) Install and run Visual Studio Installer and select “C++ Build Tools” (default values)
3) go to CMake web site and run Windows installer
4) install CMake, make sure that you check “Add CMake to the system PATH” check box
5) go to Qt web site and get Open Source installer
6) run the installer, select option “MSVC 2017 32-bit” in “Qt 5.XX” section, and the default options in “Developer and Designer Tools” section
7) add Qt path to system PATH (in my case it was C:\Qt\5.13.0\msvc2017\bin)
Now let’s build our first GUI application:
- create folder “qtest”
- inside qtest create file named CMakeLists.txt (case sensitive!)
cmake_minimum_required(VERSION 3.5)

project(QTestApp
	VERSION 1.0.0
	LANGUAGES CXX)

set(CMAKE_CXX_STANDARD 14)

find_package(Qt5 COMPONENTS Widgets REQUIRED)

set(CMAKE_AUTOMOC ON)
set(CMAKE_AUTORCC ON)
set(CMAKE_AUTOUIC ON)

if(CMAKE_VERSION VERSION_LESS "3.7.0")
	set(CMAKE_INCLUDE_CURRENT_DIR ON)
endif()

add_executable(QTestApp src/qtest.cpp)

target_link_libraries (QTestApp Qt5::Widgets)- inside qtest create folder “src”
- inside src create file named qtest.cpp
#include <QtWidgets/QApplication>
#include <QtWidgets/QWidget>
#include <QtWidgets/QGridLayout>
#include <QtWidgets/QLabel>

int main(int argc, char *argv[])
{
	QApplication app(argc, argv);

	QWidget widget;
	widget.resize(400, 400);
	widget.setWindowTitle("QTestApp");

	QGridLayout *gridLayout = new QGridLayout(&widget);

	QLabel * label = new QLabel("Hello from JumpStartProgramming.com!");
	label->setAlignment(Qt::AlignVCenter | Qt::AlignHCenter);

	gridLayout->addWidget(label);

	widget.show();

	return app.exec();
}
- inside ‘qtest’ create folder “build”
- go to the folder ‘build’ in the command line (on Windows it should be ‘Developer Command Prompt for VS 2019’ and not a regular Command Prompt)
- run…
cmake ..
cmake --build .
QTestApp.exe (Windows)
./QTestApp (Linux)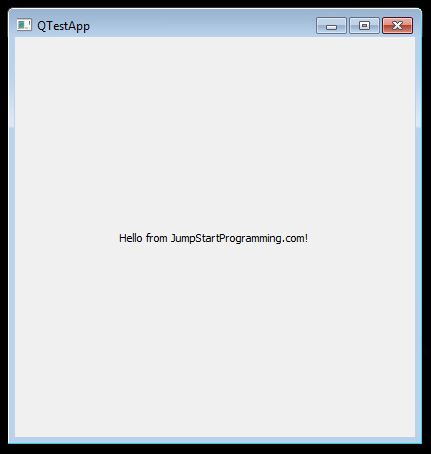
That’s it folks! Easy, right?
Source code is available here.